In this post, I walk through the steps I took in order to network boot a Raspberry Pi with support for running Docker. Most guides on network booting a Pi use NFS for storage and therefore don’t support running Docker because the default storage driver is overlay2, which uses overlayfs, which as of this writing does not support NFS when using multiple lower layers.
Therefore, instead of using NFS we will use iSCSI with ZFS as the backing store. While there are guides out network booting a Pi using iSCSI, there are certainly fewer of them and it seems to be the path less traveled. Nothing I present in this guide is particularly groundbreaking – it’s mostly a combination of the work of many other guides (which I’ve tried my best to link to in each section). However, some bugs and quirks that were avoided in older guides have since been fixed and are no longer necessary, so I thought an updated guide with a ZFS twist could be helpful!
I’m going through this exercise because I’m one of the many people that has gotten burned by having their Pi’s SD card die and not having proper backups. Well no more! Of course, a simpler solution could be to boot via a USB hard drive, but where’s the fun in that? In all seriousness, booting from the network does give us some cool advantages: we can use the much larger storage capacity of a server, we get all the cool features and reliability of ZFS, and we can easily reimage the Pi remotely!
Overview
For this guide, I’ll be using a Raspberry Pi 3 Model B+. From what I’ve read, this should work for the Raspberry Pi 3 Model B and the Raspberry Pi 4, although I don’t have those devices so I haven’t tested it first-hand.
To support the network booting, I have my server setup to be running Proxmox as a hypervisor that is hosting an Ubuntu Server VM to run Docker containers. I have my Proxmox server setup to use ZFS (and eventually will be setting up MergerFS+SnapRAID). I will be using the Proxmox host itself to present NFS shares and iSCSI targets, but will use Docker containers to do the rest (TFTP).
When the Pi network boots, it will discover the IP address via DHCP of a TFTP server that will provide the contents necessary to bootstrap the Pi (essentially, this is bootcode.bin and the rest of the /boot partition). The TFTP server will be a Docker container that will get its content via an NFS share exposed by the host. Later, the Pi will mount this NFS share as its /boot partition such that future kernel updates will be reflected over the network.
We will configure the contents of the TFTP share to instruct the Pi to boot using a special initramfs image that we’ll build that has iSCSI support and will instruct the Pi to mount its root partition via iSCSI. This iSCSI target will be exposed on the Proxmox host and be backed by a ZFS block device.
See? It’s almost too easy!
Security (or lack thereof)
It’s important to acknowledge that this setup is extremely insecure. I’m hardly a security expert, but despite that, I’m still able to poke enough holes in this to make it look like Swiss cheese:
- The DHCP broadcast to discover the TFTP server could be intercepted and pointed at a malicious TFTP share.
- The entire contents of the Pi’s
/bootdirectory are accessible via NFS and read/write-able, and we’ve only locked that down by IP address. Using this, the iSCSI username and password can be discovered, granting read/write access to the root partition. - I’m not sure if NFS or iSCSI are even encrypted over the network.
I’ve tried to mitigate this (somewhat) in this guide by attempting to lock things down as much as possible (using read-only when possible, using auth, etc.). Understand, however, that this is still the equivalent of putting the keys to your house under the front doormat – it wouldn’t take much to compromise this setup.
This being said, I weigh these risks against my threat model. To exploit any of these concerns, an attacker would already have to be in my network and able to intercept and manipulate traffic. Furthermore, I don’t intend to do anything mission-critical or sensitive on my Pi – I’m just going to be using it to run the OpenZWave Docker container for integration with Home Assistant. I’m hardly concerned about having a potential attacker be able to control my lights!
There are probably ways to lock this down that I may explore in the future. Secrets could be stored on the SD card. The Pi could be placed into its own vLAN. Probably other stuff as well – have I mentioned I’m not a security guru? I’d love to hear suggestions on how to improve upon this! But I’ve determined that this is good enough, for me, for my risk model, for now.
Let’s begin…
Prepare Raspberry Pi’s OS
- Install the Raspberry Pi OS onto an SD card using your method of choice. For this guide, I used
2021-01-11-raspios-buster-armhf-lite.zip. - Boot the Pi from the SD card, logging in as the user “pi” with password “raspberry”.
- Immediately change the pi user’s password:
$ passwd- Update the Pi:
$ sudo apt update
$ sudo apt dist-upgrade- Configure the Pi, specifically the Locale, Timezone, and WLAN Country, all located underneath Localization options.
$ sudo raspi-config- Set the hostname:
$ sudo vi /etc/hostname
$ sudo vi /ets/hosts- Optionally, enable and start SSH:
$ sudo systemctl enable ssh
$ sudo systemctl start ssh- Disable the swap file because swapping over the network seems like a pretty bad idea (although it might still behave better than many SD cards…)
$ sudo systemctl disable dphys-swapfile- Verify that USB booting is enabled.
$ vcgencmd otp_dump | grep 17:
17:3020000a- Edit
/boot/config.txt.- If USB isn’t enabled (the output doesn’t match above), then add
program_usb_boot_mode=1to the file. - Optionally, while we’re here, disable things you won’t be needing. I personally disabled audio (comment out
dtparam=audio=on), WiFi (dtoverlay=disable-wifi), and Bluetooth (dtoverlay=disable-bt).
- If USB isn’t enabled (the output doesn’t match above), then add
$ sudo vi /boot/config.txt- Reboot
$ sudo reboot- If USB booting wasn’t enabled, verify that it is now enabled and then remove the line from
/boot/config.txt. - Verify that swap is disabled and then remove the old swap file
$ free -h
	      total        used        free      shared  buff/cache   available
Mem:          924Mi        40Mi       182Mi        11Mi       701Mi       804Mi
Swap:            0B          0B          0B

$ sudo rm /var/swap- Discover the Pi’s serial number, and take note of this for later. My Pi’s serial happens to be
fb5d1ece. I’ve set my Pi’s hostname accordingly topi-fb5d1ece.
$ cat /proc/cpuinfo | grep Serial- Lastly, while we’re doing stuff on the Pi, we’ll install open-iscsi to discover the “initiator name”. Take note of this for later.
$ sudo apt install open-iscsi
$ sudo systemctl enable open-iscsi
$ sudo systemctl start open-iscsi
$ cat /etc/iscsi/initiatorname.iscsi- Optionally, overwrite the default iSCSI “initiator name”:
$ sudo vi /etc/iscsi/initiatorname.iscsi
$ sudo systemctl restart open-iscsi
Sources:
Configure Networking
Configure DHCP TFTP
We need a way to respond to the Pi via DHCP with the IP of the TFTP server we’ll be setting up later that will host our /boot directory. There are a number of ways to do this that may vary based on your setup. Many of the guides out there will mention having to setup a Raspberry Pi Boot option, however, I didn’t find this necessary anymore. I presume that this has been fixed with more recent bootcode.bin‘s.
- Option 1 – Setup your DHCP server to respond with the IP of wherever you’ll be hosting the TFTP container.
- My network is running Ubiquiti’s UniFi gear, so this was as easy as setting this in Settings > Networks > LAN (Edit) > Advanced DHCP Options > DHCP TFTP Server.
- This post outlines how to configure isc-dhcp, if you’re running that on your network.
- Option 2 – Setup dnsmasq. This should be agnostic of what DHCP server you’re running and is the “sure-fire” method. The official documentation and this post both explain how to do this, although not in Docker (I’d bet dnsmasq images exist though).
Optionally, set Static IP for the Pi
While this isn’t required, I find that I prefer to have a Static IP for the Pi. This way, it’s easier to SSH into and I’m able to lock down the NFS and iSCSI shares a little tighter in the following sections.
Note that if you don’t set a Static IP, your Pi might obtain two separate DHCP leases. This post discusses how to resolve that.
Once again, since I’m running UniFi gear, this was as easy as setting a static IP for the Pi. Yes, this means I’m using DHCP to assign an IP to the Pi, but since it’s static, I avoid the issue of duplicate leases.
Snapshot the host
Before installing a bunch of things into the Proxmox host, since I’m using ZFS, I can take a snapshot of the host, should anything go haywire and I need to rollback. Optionally, all the VMs on the host can be stopped prior to taking the snapshot to get a more accurate image. I didn’t bother with this.
# zfs snapshot -r rpool@20200117-pre-netboot
# zfs list -t snapshot
Optionally, update the host
While I’m messing with the system install, I figured I might as well install any updates.
# apt udpate
# apt dist-upgrade
# reboot
Create ZFS datasets
We’re going to create two datasets: one that will serve the necessary boot files for booting via TFTP and for mounting and updating once booted via NFS and one that will serve as the root volume. The root volume can be any desired size or name (it doesn’t have to match the Pi’s serial number).
# zfs create rpool/netboot
# zfs create -p -V 8gb rpool/iscsi/pi-fb5d1ece
Optionally (but recommended), create a filesystem specifically for our Pi (using your Pi’s serial number). I recommend setting a quote for this filesystem as well because it will be easily writeable via NFS, so it’s nice to constrain its growth.
# zfs create rpool/netboot/fb5d1ece
# zfs set quota=256M rpool/netboot/fb5d1ece
Alternatively, LVM could probably be used. But I already have ZFS and I think its features are neat so I’ll be using that.
Sources
- https://old.reddit.com/r/Proxmox/comments/jppohv/a_very_short_guide_into_how_proxmox_uses_zfs/
- https://docs.oracle.com/cd/E19253-01/819-5461/gamnq/index.html
- https://docs.oracle.com/cd/E19253-01/819-5461/gaypf/index.html
Install and setup NFS on the host
I’ll be using the kernel’s NFS implementation rather than ZFS’s NFS implementation. I don’t doubt that ZFS’s implementation is suitable for this purpose, however, most of the existing guides use NFS and I was already planning on using NFS for non-ZFS data in the future anyways.
First, we’ll make the directories that we’ll serve NFS out of. Then we’ll setup a “bind mount” from where the ZFS dataset is mounted to the directory we just created. Update January 30, 2021 – The fstab entry’s options were changed to be rbind instead of bind (in case separate boot datasets were created) and to wait for the ZFS datasets to be mounted.
# mkdir -p /srv/nfs/netboot
# vi /etc/fstab
Add the following line...
/rpool/netboot /srv/nfs/netboot none   rbind,x-systemd.requires=zfs-mount.service   0   0
# mount -a
Now that the directory is mounted, we’ll create the directory for our particular Pi’s boot data to live in. Whenever a Pi network boots, it loads bootcode.bin from the root of the TFTP share, then searches for the remaining files in a directory with its serial number before finally looking in the root. We’ll create a directory for our particular Pi using the serial number we noted above:
# mkdir /srv/nfs/netboot/fb5d1ece Now that our directories are in place, we can install the NFS server:
# apt install nfs-kernel-serverWe’ll edit /etc/exports to expose the two shares. The first share gives read-only access to the entirety of the TFTP share to the IP address of the VM that’s running Docker. This will be needed when we setup the TFTP Docker container. The container only needs serve the files, so we only give it read-only access. The second share gives read/write access to our particular Pi. Our Pi will mount this as its /boot directory so that any updates will get persisted. This assumes that both the Docker VM and Pi have static IPs. If this isn’t the case, a simpler configuration that simply provides read/write access to the entirety of the share would suffice. It’s imporant to note that the no_root_squash option is extremely insecure because this allows anybody to write files onto the host as root. However, we have this pretty well constrained to just this boot directory, so the risk seems minimal. Update January 30, 2021 – Added the crossmnt option to the parent netboot share (in case separate boot datasets were created).
/srv/nfs/netboot {DOCKER IP}(ro,sync,no_subtree_check,crossmnt)
/srv/nfs/netboot/fb5d1ece {PI IP}(rw,sync,no_subtree_check,no_root_squash)
Finally, we’ll refresh NFS with its new configuration:
# /etc/init.d/nfs-kernel-server reloadSources:
- https://wiki.debian.org/NFSServerSetup
- https://wiki.archlinux.org/index.php/NFS
- https://wiki.archlinux.org/index.php/ZFS#Bind_mount
- https://unix.stackexchange.com/questions/42131/how-to-properly-export-and-import-nfs-shares-that-have-subdirectories-as-mount-p
Install iSCSI on the host
First we’ll install iSCSI:
# apt install targetcli-fbNext, we’ll try to enable and start iSCSI, but this will likely fail because Debian (which Proxmox is based off of) doesn’t ship a systemd unit file for some reason(?).
# systemctl enable target
# systemctl start target
Assuming that worked, the rest of this section can be skipped. If it didn’t work, we’ll have to create the systemd unit file.
Create the file /lib/systemd/system/target.service:
[Unit]
Description=Restore LIO kernel target configuration
Requires=sys-kernel-config.mount
After=sys-kernel-config.mount network.target local-fs.target zfs-import.target

[Service]
Type=oneshot
RemainAfterExit=yes
ExecStart=/usr/bin/targetctl restore
ExecStop=/usr/bin/targetctl clear
SyslogIdentifier=target

[Install]
WantedBy=multi-user.target
Then, copy the file, mark it as executable, and attempt to enable and start again:
# cp /lib/systemd/system/target.service /etc/systemd/system/target.service
# chmod 644 /etc/systemd/system/target.service
# systemctl enable target
# systemctl start target
Sources:
- https://wiki.debian.org/SAN/iSCSI/LIO
- https://www.server-world.info/en/note?os=Debian_10&p=iscsi&f=1
- https://forum.proxmox.com/threads/iscsi-lio-targetcli-no-config-after-reboot.52966/#post-269957
Setup iSCSI on the host
Next we’ll set up the iSCSI “target” on the host. In iSCSI terms, the “client” is the “initiator” and the “server” is the “target.
# targetcliFirst we’ll create the backing store. This can be named whatever you’d like, I named mine consistently with my Pi’s hostname (and the name of the ZFS volume).
cd /backstores/block
create name=pi-fb5d1ece dev=/dev/zvol/rpool/iscsi/pi-fb5d1ec
Next, we’ll create the target and cd into it:
cd /iscsi
create
- or, specify the name like... -
create iqn.2003-01.org.linux-iscsi.pve.x8664:pi-fb5d1ece
ls
cd {IQN}/tpg1/
We’ll map to the backing store:
cd luns
create /backstores/block/pi-fb5d1ece
cd ..
Then we’ll create an ACL. We’ll be using the “initiator name” that we noted above.
cd acls
create {PI IQN}
cd {PI IQN}
set auth userid=<username>
set auth password=<password>
Lastly, we’ll confirm the entire configuration:
cd /
ls
You should see something like this:
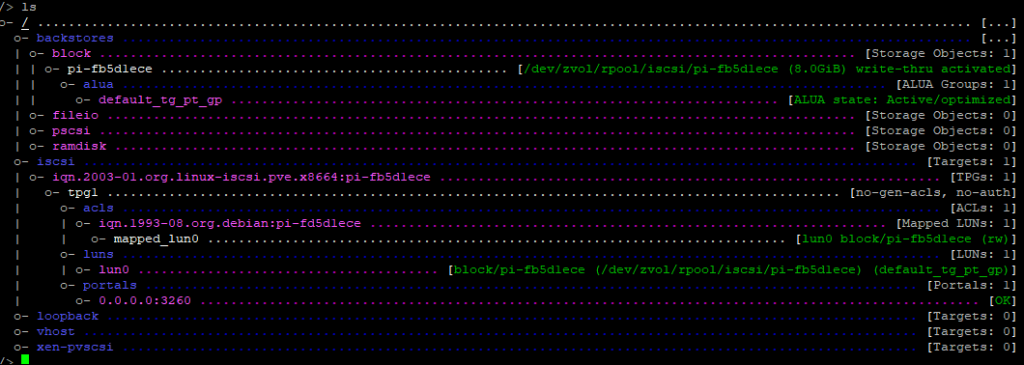
Finally, save and quit:
saveconfig
exit
Sources:
- https://www.rootusers.com/how-to-configure-an-iscsi-target-and-initiator-in-linux/
- https://wiki.archlinux.org/index.php/ISCSI/LIO
Setup iSCSI “initiator” on the Pi
In order to be able to connect to your iSCSI drive during the boot, you’ll need to load an initrd image with the required module.
First, tell the initramfs tool to include the iscsi module by creating the required flag file and create the initramfs image for the current kernel:
$ sudo touch /etc/iscsi/iscsi.initramfs
$ sudo update-initramfs -v -k `uname -r` -c
The new initrd can be found in /boot:
$ ls -lrt /boot/init*
-rwxr-xr-x 1 root root 9106324 Jan 18 09:50 /boot/initrd.img-5.4.83-v7+
We’ll need to edit the iSCSI configuration file so that the module can successfully load:
$ sudo vi /lib/modules-load.d/open-iscsi.conf

Change ib_user -> #ib_user
Then reboot:
$ sudo rebootAfter rebooting, confirm that the modules loaded successfully:
$ systemctl status systemd-modules-load
● systemd-modules-load.service - Load Kernel Modules
   Loaded: loaded (/lib/systemd/system/systemd-modules-load.service; static; vendor preset: enabled)
   Active: active (exited) since Mon 2021-01-18 10:44:39 PST; 1min 20s ago
     Docs: man:systemd-modules-load.service(8)
           man:modules-load.d(5)
  Process: 110 ExecStart=/lib/systemd/systemd-modules-load (code=exited, status=0/SUCCESS)
 Main PID: 110 (code=exited, status=0/SUCCESS)

Warning: Journal has been rotated since unit was started. Log output is incomplete or unavailable.
Next, discover all the iSCSI targets available:
$ sudo iscsiadm -m discovery -t sendtargets -p <IP_OF_YOUR_ISCSI_SERVER>
10.0.0.10:3260,1 iqn.2003-01.org.linux-iscsi.pve.x8664:pi-fb5d1ece
Consider rebooting the server to ensure the iSCSI targets persist.
Next, mount the target:
$ sudo iscsiadm -m node -l -T <TARGET_IQN> -p <IP_OF_YOUR_ISCSI_SERVER>
Logging in to [iface: default, target: iqn.2003-01.org.linux-iscsi.pve.x8664:pi-fb5d1ece, portal: 10.0.0.10,3260] (multiple)
Login to [iface: default, target: iqn.2003-01.org.linux-iscsi.pve.x8664:pi-fb5d1ece, portal: 10.0.0.10,3260] successful.
Confirm that the target is mounted and take note of the dev entry (probably /dev/sda).
$ tail /var/log/messages
Jan 17 20:04:57 pi-fd5d1ece kernel: [   12.598873] IPv6: ADDRCONF(NETDEV_CHANGE): eth0: link becomes ready
Jan 18 09:47:56 pi-fd5d1ece kernel: [49379.758970] scsi host0: iSCSI Initiator over TCP/IP
Jan 18 09:47:56 pi-fd5d1ece kernel: [49379.783417] scsi 0:0:0:0: Direct-Access     LIO-ORG  pi-fb5d1ece      4.0  PQ: 0 ANSI: 5
Jan 18 09:47:57 pi-fd5d1ece kernel: [49379.792657] sd 0:0:0:0: [sda] 16777216 512-byte logical blocks: (8.59 GB/8.00 GiB)
Jan 18 09:47:57 pi-fd5d1ece kernel: [49379.792684] sd 0:0:0:0: [sda] 8192-byte physical blocks
Jan 18 09:47:57 pi-fd5d1ece kernel: [49379.794005] sd 0:0:0:0: [sda] Write Protect is off
Jan 18 09:47:57 pi-fd5d1ece kernel: [49379.795789] sd 0:0:0:0: [sda] Write cache: enabled, read cache: enabled, supports DPO and FUA
Jan 18 09:47:57 pi-fd5d1ece kernel: [49379.797226] sd 0:0:0:0: [sda] Optimal transfer size 8192 bytes
Jan 18 09:47:57 pi-fd5d1ece kernel: [49379.806048] sd 0:0:0:0: Attached scsi generic sg0 type 0
Jan 18 09:47:57 pi-fd5d1ece kernel: [49379.870178] sd 0:0:0:0: [sda] Attached SCSI disk
Sources:
- https://stuff.drkn.ninja/post/2016/11/08/Net-boot-(PXE-iSCSI)-with-a-RaspberryPi-3
- https://bugs.launchpad.net/ubuntu/+source/open-iscsi/+bug/1566468
- https://askubuntu.com/questions/877245/systemd-modules-load-failed-to-start
Copy Pi installation to target
On the Pi, format the iSCSI target:
$ sudo mkfs.ext4 /dev/sdaTake note of new drive’s UUID, we’ll be using this later
$ sudo blkid /dev/sda
/dev/sda: UUID="c709776d-4914-4508-9afe-20369cbc2bfb" TYPE="ext4"
Mount the iSCSI target:
$ mount /dev/sda /mntCopy the Pi installation to the iSCSI target, excluding system directories, and then make new system directories:
$ rsync -avhP --exclude /boot --exclude /proc --exclude /sys --exclude /dev --exclude /mnt / /mnt/
$ mkdir /mnt/{dev,proc,sys,boot,mnt}
Finally, we need to fix the fstab on the iSCSI target, otherwise when we do finally network boot the Pi will try to mount the SD card:
$ vi /mnt/etc/fstab

Remove both lines...

Add the following two lines...
UUID={DISK UUID} / ext4 defaults,noatime 0 1
{NFS SERVER IP}:/srv/nfs/netboot/{PI SERIAL} /boot nfs4 defaults,noatime 0 2
Sources:
Setup TFTP Docker container
In the Docker VM, add the following to your docker-compose file:
services:
  tftp:
    image: pghalliday/tftp:latest
    container_name: tftp
    volumes:
     - tftp-nfs:/var/tftpboot
    ports:
      - 69:69/udp
    restart: unless-stopped

volumes:
  tftp-nfs:
    driver_opts:
      type: "nfs"
      o: "addr={NFS SERVER IP},ro,tcp,timeo=14,nolock,soft"
      device: ":/srv/nfs/netboot"
Pull and start the container:
$ docker-compose pull
$ docker-compose up -d
Verify that the NFS mount worked correctly:
# docker exec -it tftp /bin/sh -l
# ls /var/tftpboot/
fb5d1ece
# exit
Take note that if you need to change the configuration for the NFS volume in the future that simply changing in the compose file will not apply your changes. You will instead need to docker rm it from the container (or docker rm the container first) and then docker rm the volume).
Sources:
- https://dev.to/weeee/raspberry-pi-cluster-part-1-the-boot-2fe5
- https://stackoverflow.com/a/46481637
- https://anto.online/guides/how-to-mount-an-nfs-share-into-a-container/
Prepare TFTP with the Pi’s /boot
On the host, copy the /boot directory from the Pi and cd into the directory:
# scp -r pi@yourpi:/boot/* /srv/nfs/netboot/fb5d1ece/
# cd /srv/nfs/netboot
Modify the config.txt, to use the use the initramfs image we prepared earlier that contains the iSCSI module:
# vi fb5d1ece/config.txt

Add the following line to the bottom...
initramfs <YOUR_INITRD_IMAGE> followkernel

For example...
initramfs initrd.img-5.4.83-v7+ followkernel
Now we’ll modify the cmdline.txt:
# vi fb5d1ece/cmdline.txt

console=serial0,115200 console=tty1 ip=::::{PI HOSTNAME}:eth0:dhcp root=UUID={UUID} rootfstype=ext4 elevator=deadline fsck.repair=yes rootwait ISCSI_INITIATOR={INITIATOR IQN} ISCSI_TARGET_NAME={TARGET IQN} ISCSI_TARGET_IP={TARGET IP} ISCSI_TARGET_PORT=3260 ISCSI_USERNAME={ACL USERNAME} ISCSI_PASSWORD={ACL PASSWORD} rw
Finally, remember that the Pi looks in the root for bootcode.bin. We’ll create a symbolic link from the rot to our specific Pi’s bootcode.bin. This way, if the Pi updates the bootcode.bin in its /boot directory, it’ll boot with the updated file the next time. This probably isn’t super ideal if you have a bunch of Pi’s (especially if they’re different versions), so try to keep the Pi’s roughly on the same versions. As far as I’m aware, the Raspberry Pi 4 doesn’t use bootcode.bin, so this is only a problem for older Pi’s.
# ln -s fb5d1ece/bootcode.bin bootcode.binIt might be wise to create a backup or a ZFS snapshot of the boot directory at this point, just in case a future update breaks things.
Sources:
- https://stuff.drkn.ninja/post/2016/11/08/Net-boot-(PXE-iSCSI)-with-a-RaspberryPi-3
The moment of truth!
Now it’s time to boot the Pi! Shutdown the Pi:
$ sudo poweroffOnce the Pi powers down, remove the SD card, power it back on (unplug and replug the power), and cross your fingers!
The Pi will take a while (minute-ish) to come up. If it doesn’t, proceed to the debugging section below…
Debugging
My Pi didn’t originally startup, so I have some limited experience with debugging.
If the Pi sits at a black screen (like mine) and never shows the rainbow splash screen, this means it isn’t loading the bootcode.bin properly. On any machine on your network, run tcpdump -vv -i <eth0> port 67 or port 68 or port 69, reboot the Pi, and examine the output. If you don’t see any output, then the Pi isn’t discovering the TFTP server via DHCP correctly. If you do see the output, then your TFTP server likely isn’t setup properly. Try to login to the TFTP server and get bootcode.bin. Originally I had setup my symbolic link to be an absolute path instead of a relative path, which didn’t work over NFS.
This reaches the extent of my debugging so far. For more ideas, check the sources below.
Sources:
- https://tech.xlab.si/blog/pxe-boot-raspberry-pi-iscsi/
- https://linuxhit.com/raspberry-pi-pxe-boot-netbooting-a-pi-4-without-an-sd-card/
- https://www.raspberrypi.org/documentation/hardware/raspberrypi/bootmodes/net_tutorial.md
Installing Docker on the Pi
Docker was the whole reason for using iSCSI over NFS (for me at least). Fortunately, installing Docker and docker-compose is simple!
$ curl -fsSL https://get.docker.com -o get-docker.sh
$ sudo sh get-docker.sh
$ sudo apt install docker-compose
Sources:
Kernel updates
I haven’t actually done a kernel update yet, so these instructions are just borrowed from my sources. After doing an apt dist-upgrade, the initramfs image should be created. If not, this can be created similar to above except by specifying the new kernel version instead of using uname. Then, update the config.txt to point at the new initramfs image, reboot, and cross your fingers!
Sources:
Updates
- January 30, 2021 – Fixes to support multiple netboot datasets.
Hi. Great article. I tried other articles and got stuck when I realised microk8s and docker weren’t able to run due to NFS 🙁
Do you know if iSCSI is still required to netboot or has overlayfs got better support nowadays?
Thanks