I recently purchased and configured Denon’s new AVR-X3700H receiver, and I’ve been incredibly pleased with it! I’ve been living with it for the last few weeks and wanted to share my thoughts on it – in particular, I wanted to mention things that I hadn’t seen in other reviews that I would have found helpful when doing my research or to determine the best configuration settings to apply. Maybe this will help somebody in their search for a receiver or to better leverage their new Denon receiver!
Not a review!
I feel it’s important to kick things off by saying that I don’t intend for this post to be a review. I don’t have the experience, capabilities, or access to other products to do that justice. That being said, I do want to mention that this receiver has been reviewed quite well as far as I can tell. In particular, Audio Science Review has measured several receivers from Denon’s 2020 line: the X3700H, X4700H, and X6700H; and given them all strong recommendations relative to their competitors.
The most negative review I’ve seen has been from Andrew Robinson, although he struggled to dissuade me from purchasing the receiver and my experience thus is not consistent with his. I’m not trying to suggest that I think his review is bad, that his experience is incorrect, or that he’s a bad reviewer. He has far more experience in this field than I do and rightfully speaks with much more authority. That said, it does puzzle me that he is able to be as negative as he is without presenting any data; however, I’m still wrestling with how much I personally weigh “qualitative” reviewers over “quantitative” reviewers. Upon rewatching the video, I’m wondering if he wasn’t able to dial in Audyssey correctly or if my ears are just extremely untrained and non-discerning.
My Goldilocks receiver
Having now gone through the process of picking a receiver, I now understand and appreciate how hard it is to pick the right receiver. Through a long and arduous process that involved considering every currently offered 8K receiver, I eventually narrowed my search down to the AVR-X3700H.
My search for a receiver started with requirements…
First, I knew I wanted an “8K” receiver, not because I intend to purchase an 8K TV or that I even expect to do any 4K 120Hz gaming (at least, not in the near future), but because “8K” receivers are HDMI 2.1 receivers, which means that they support ALLM (Auto Low Latency Mode) and VRR (Variable Refresh Rate). I’m aware that recent news has come to light indicating that my LG C9 OLED can exhibit poor gamma at low refresh rates, but I wanted to buy as “future proof” as a receiver as I could even though I don’t intend to upgrade my TV in the foreseeable future.
Secondly, I knew that I wanted a receiver with Atmos/DTS:X support. While my setup is currently only a 5.2 setup, I’ve been very interested in object-based surround formats and wanted my next receiver to support these audio formats. The worst case, I figured, is that I wouldn’t end up ever adding height channels – but that would simply mean the receiver has more headroom to drive the five channels I actually have.
With my requirements established, I could then evaluate the competitive landscape.
Right out of the gate, the HDMI 2.1 requirement eliminated most receivers are the market, leaving just a few offerings from Denon/Marantz (Sound United) and Yamaha. I was able to eliminate Yamaha because their HDMI 2.1 offering is fairly limited in comparison to Denon/Marantz, offering only the RX-V4A (5.2 Channel) and the RX-V6A (7.2 Channel), neither of which support object-based surround formats. Next, I was able to eliminate Marantz because their line is almost identical to Denon’s line, which unsurprising because they’re owned by the same parent company. As far as I could tell, the Marantz receivers offer nearly identical features as their Denon counterparts, seemingly just with slightly better amplifiers to justify their higher price tags. Investing in beefier amplifiers integrated into a receiver rather than an external amplifier didn’t make sense to me when the Denon receivers behave so nicely as pre-processors in their pre-amp mode (more info here and here). With the price jump from Denon to Marantz being several hundred dollars and the power jump being relatively small (remember that it takes double the power to increase volume by just 3dB), I figured if I found myself wanting more power I could just put those savings towards an external amplifier that wouldn’t go obsolete and need to be replaced like a receiver would.
This process of elimination left me with Denon’s 2020 line of receivers: the AVR-S960H, the AVR-X2700H, the AVR-X3700H, the AVR-X4700H, and the AVR-X6700H. Audioholics has a good round-up of the X-Series in their announcement post that I consulted frequently since Denon doesn’t seem to present this information in a consolidated manner.
I was able to eliminate the AVR-S960H and the AVR-X2700H outright because they only would support two height channels and only support Audyssey MultEQ XT instead of the more capable Audyssey MultEQ XT32.
This left me with the AVR-X3700H, AVR-X4700H, and AVR-X6700H. This was the trickiest part of this whole process and something that I agonized over for a long time. I knew that the extra amplifier power of the more expensive models didn’t appeal to me. But since I hadn’t figured out my Atmos layout, I wasn’t sure if I would want the AVR-X4700H/AVR-X6700H’s support for the Auro 3D audio format with its allegedly superior upmixer or if I’d want the AVR-X6700H’s support for decoding six height channels as opposed to just four. I pondered and researched this for some time, eventually concluding that I couldn’t justify the higher price tags of the AVR-X4700H and AVR-X6700H and could therefore eliminate them because an Auro 3D layout wouldn’t fit in my space, there’s hardly any content that natively supports Auro 3D (especially here in The States), I don’t foresee myself using any upmixers, and object-based surround is rarely implemented to the fullest extent in many/most films and would therefore rarely scale to six height channels.
Finally, at long last, by eliminating the receivers that were “too small” and “too big”, I had reached the conclusion that the X3700H was “just right” – it was my “Goldilocks” receiver!
The 8K elephant in the room
This new line of Denon receivers had a pretty smooth launch over the summer because there weren’t any consumer 8K 60Hz / 4K 120Hz sources available on the market. But as summer turned to fall, 8K sources started to become available in the form of the GeForce RTX 3000-series of graphics cards, the PlayStation 5, and the Xbox Series S/X, and with them, tales of woe and incompatibility with 4K 120Hz content.
Vincent Teoh from HDTVTest investigated this in depth and found that while the Denon receivers support 4K 120Hz signals from both PlayStation 5 and GeForce RTX 3000-series graphics cards, they don’t support the Xbox Series S/X. His theory is that this is because the former are using uncompressed signals whereas the Xbox is using a compressed signal in the form of DSC. He notes in an earlier video that this is not limited to just the Denon receivers, however, since the Marantz and Yamaha receivers all use the same HDMI chips manufactured by Panasonic/Nuvoton. It’s worth mentioning that the Yamaha receivers do not support 8K 60Hz / 4K 120Hz yet and claim it will come in a firmware upgrade at some point in the future.
The suggested work-around from Denon/Marantz at this point in time is to directly plug any incompatible sources into your TV and then use eARC to return audio to your receiver. While I assume this would work, I haven’t been able to confirm it, despite owning both an LG C9 OLED capable of displaying 4K 120Hz content and an Xbox Series X capable of outputting such content because I wasn’t able to find certified HDMI 2.1 cables in the 20 feet lengths required to make the run from my receiver to my TV. Admittedly, I didn’t search very hard for cables yet because I don’t really foresee 120Hz gaming to be a reality on this new generation of consoles, at least not without serious graphical fidelity compromises.
It should be noted that I knew about this 8K compatibility mess before purchasing the AVR-X3700H but had so massively outgrown my old receiver that I determined I wanted to upgrade despite these issues. Knowing that all the receivers currently on the market would be affected by the same issue was a strange comfort to me and helped me pull the trigger.
Unboxing and initial setup
I unboxed my new AVR-X3700H and compared it side-by-side with my old receiver, the Denon AVR-S530BT. I expected the new receiver to be larger than its little brother, but I was surprised by how much heavier it was and how many more inputs and outputs it had on its back panel. Upon hooking it up and completing the initial setup, I was immediately impressed with how much more capable this receiver was compared to my old receiver. I quickly realized how much I had been fighting my old receiver: it didn’t have enough inputs, it had even fewer 4K inputs, its room EQ was abysmal, it didn’t support advanced HDMI features like Dolby Vision or ALLM… you get the picture. In comparison, this new receiver was ready to go – it touted the features I wanted but it also just got out of the way and let me enjoy my setup without the friction I was accustomed to.
Audyssey! Wow!
I had heard good things about Audyssey, and as I mentioned above, one of the deciding features in this receiver’s favor was that it supports the most robust Audyssey implementation, Audyssey MultEQ XT32. Despite what I had heard, my old receiver’s laughable and persistent Room EQ had taught me to prepare for the worst, and I did just that, showing up for battle armed with the Audyssey MultEQ Editor app, ratbuddyssey for tweaking files generated by the app, my stand-mounted UMIK-1 calibrated microphone, REW, Multi-Sub Optimizer, and my miniDSP 2×4 HD.
My plan of attack was to first attempt to understand Audyssey and its various features. In order to do this, I performed a rushed Audyssey calibration, putting the setup microphone in only a couple locations before cutting the calibration short. Since it was getting late in the night, I gave the hacked setup a listen and was surprised – to my untrained ear, it seemed like it had done a decent job! Being a man of science, however, this wasn’t sufficient for me – how could I trust my fallible human ears when I could collect cold hard data? Refusing to let my experience deviate me from my trajectory, the following morning, I set out with my microphone and REW and started measuring the effect of the numerous Audyssey settings. I made some interesting and fascinating discoveries that I intend to share at some point, however, that’s beyond the scope of this post.
Armed with an understanding of the intricacies of Audyssey, my next plan was to tame the beast: I would perform a careful and complete Audyssey calibration, measure at each of the listening positions using my calibrated microphone and REW, perform manual adjustments to the Audyssey target curves as necessary, perform another round of measurements, and then finally use Multi-Sub Optimizer to flatten out the subwoofers. I took my first set of measurements at my main listening position and inspected the data. Just as I suspected, the graphs weren’t flat, confirming my preconceived notions that all receiver-based EQ is garbage. “Aha!,” I concluded, “Audyssey isn’t all it’s cracked up to be!”. I rolled up my sleeves, mentally preparing to execute the remainder of my battle plan while I measured the remaining seven microphone positions. When I had finished measuring, I averaged their responses in REW and was shocked to find that the response curve was very flat, especially for the acoustic challenges of my room. I couldn’t believe it! Could Audyssey actually be the real deal? I performed the measurements again, this time to test the integration of the subwoofers and the mains. Again, the response curve was very flat.
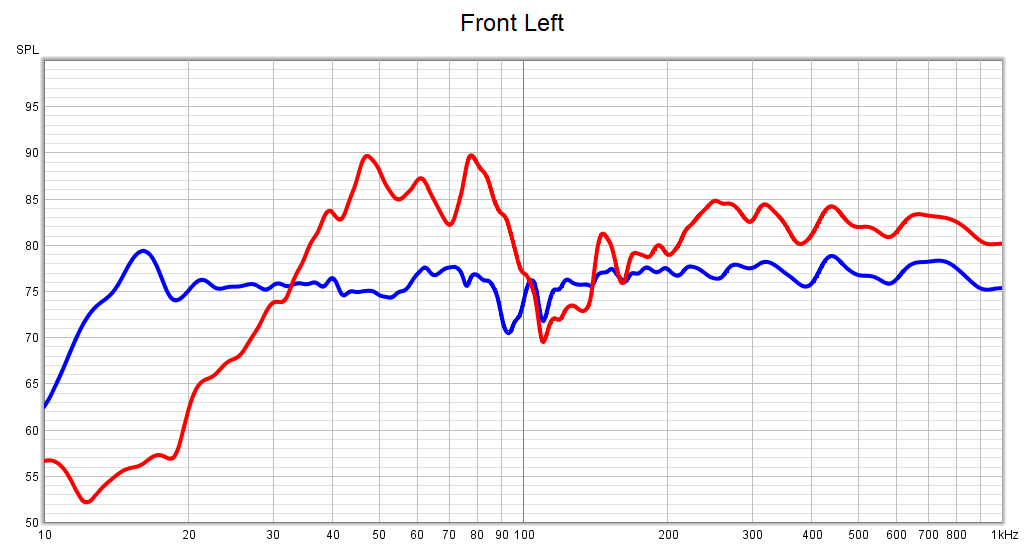
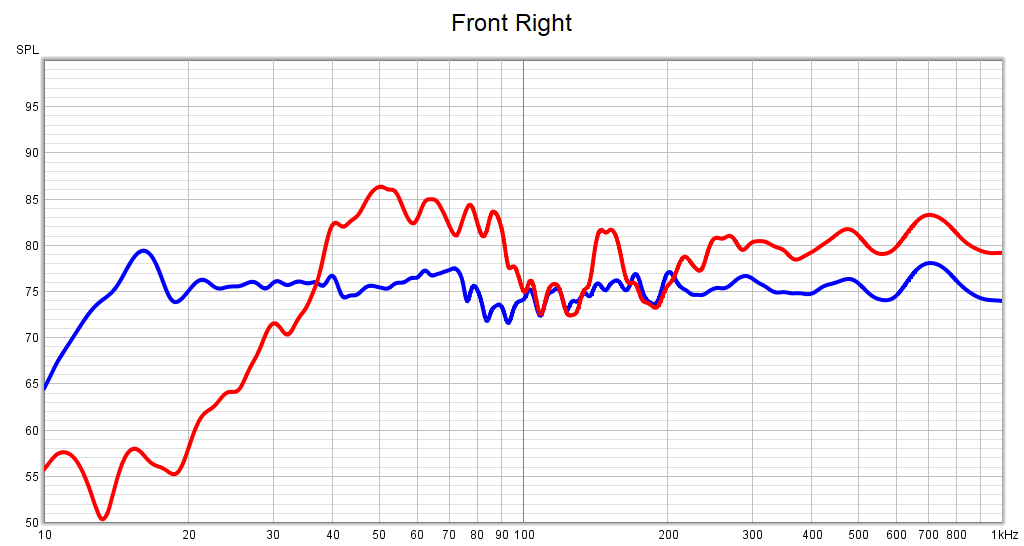
Don’t believe me? Good, I didn’t believe it myself! Fortunately, I have data to back me up! Below is the data I measured for the Front Left and Front Right channels. The blue line is the combined response of the speaker with both the subwoofers and Audyssey enabled. Unfortunately, I didn’t capture the combined response of the mains with the subwoofers enabled and Audyssey disabled, so the best comparison I can easily show is the response of just the speaker with both the subwoofers and Audyssey disabled, which is displayed as the red line. Notice how effectively Audyssey tames the response of both speakers, especially the massive spikes in the left speaker at ~48Hz and ~79Hz. Note that these graphs only go up to 1kHz because I’ve only configured Audyssey to optimize between 20Hz and 500Hz.
Don’t believe me? Good, that makes two of us – I’m still surprised at how well Audyssey performed. Thankfully for Audyssey, I have the data to back it up. Below are two graphs for the left and right channels that compare the response with and without Audyssey enabled. The blue line is the combined response of the subwoofers and speaker with Audyssey enabled. The red line is the speaker without the subwoofer or Audyssey (unfortunately I didn’t capture the combined response without Audyssey). The objective is to achieve the flattest possible response, and Audyssey managed to do just that. Notice how, in particular, Audyssey knocked down the massive spikes at ~47Hz and ~78Hz in the Front Left channel. Note that these graphs end at 1kHz because I only had Audyssey optimize up to 500Hz for “reasons”. Furthermore, ignore below 20Hz on the graph as that starts to become the limit of human hearing and I don’t think Audyssey attempts to correct below that point.
Looking at this data, I’m still astonished at how effective Audyssey was in my setup. In the months I had spent toiling and tweaking my old setup with my various tools, I had never seen such a flat response in my room. In all fairness, I wasn’t able to EQ my mains with my old receiver, but Audyssey’s achievements with the subwoofers are as good if not better than I had been able to achieve. I’m floored – I really thought that achieving such a flat response would require endless tweaking but all it really took was playing by Audyssey’s rules! At some point I might try to see if I can improve upon this slightly to address some of the dips around 90Hz, but I’m hesitant to do so not only because of the effort required for minimal gains but also because my (limited) understanding is that Audyssey employs FIR filters that don’t interfere with the time domain whereas the IIR filters employed by Multi-Sub Optimizer and the miniDSP do. Nevertheless, kudos to the folks over at Audyssey for this achievement!
I have a lot more to say about Audyssey, so stay tuned for some follow-up post(s)!
More noteworthy features
Beyond my amazement of Audyssey, I wanted to call out some additional features that I’m excited about but haven’t had the opportunity to use yet:
- Web Interface – The AVR-X3700H exposes an HTTPS website with the ability to control all of the settings within the receiver. I suspect that this could easily be leveraged to create an API to manage the receiver through home automation and I wouldn’t be surprised if somebody has already done this.
- Dual Speaker Presets – This new 8K line of receivers support a feature that lets you toggle between two entirely different set of configuration options, including speaker layouts, amp assignments, and Audyssey profiles. I was originally planning on using that if/when I hook up height channels to switch between a 5.2.4 configuration and a 7.2 configuration using the two rear-most height channels as the rears. However, I think this could be achieved by automation that leverages the web interface. I’m now thinking I might instead use this to support experimenting with a second Audyssey profile that has a narrower sweet spot for critical music listening.
- Pre-amp Mode – I mentioned this above but it’s a big enough deal that it deserves another mention here. This receiver is cheaper than every pre-processor than I’m aware of, it’s sports an amazing array of features, and it has amplifiers built-in. But the fact that the amplifiers can be disconnected and have this receiver act as a pre-processor is quite the proposition at this price-point. If one were so inclined, they could even use the receiver’s amplifiers for a massive Zone 2 or a multi-room audio setup. This feature introduces a lot of flexibility into this receiver.
- HDMI Cable Tester – The 8K line of receivers support plugging both ends of an HDMI cable into the back to test the cable. I haven’t used it yet and can’t vouch for it, but I imagine that this will come in handy. “Proper” HDMI testers are enormously expensive so having this built-in to a consumer-grade receiver is a nice touch. I’ve already been finding that HDMI cables are finicky with HDMI 2.0, especially at longer runs, and I don’t expect that to get any better with HDMI 2.1, although the official HDMI certification app might help.
Complaints
As with any product, there are a few places where this receiver falls short, although they’re all minor in my opinion:
- Shoddy 8K 60Hz / 4K 120Hz implementation – I discussed this above but it’s worth mentioning again because it’s the biggest disappointment with this receiver. It’s unfortunate that this receiver is marketed as an “8K” receiver but doesn’t support all 8K devices and only has one 8K input. I expect this will catch consumers off-guard and earn Denon some blow-back.
- Bad default settings – Denon has packed this receiver with a bunch of features to support a wide range of scenarios that this receiver might encounter. However, I think many of the defaults cause a suboptimal out-of-the-box experience, and I believe Denon is doing themselves a disservice in the selection of these defaults and not explaining them adequately in the manual. I’ll expand on some of these settings in a later section.
- Bad “auto” sound mode settings – While this is very similar to the previous point, it’s so egregious that I had to call it out separately. The receiver supports an “auto” mode, which is supposed to pick the proper sound mode based on the source material. However, when I fed it with a DTS-HD Master Audio source, it instead decided to use the DTS Neural:X upmixer, which sounded truly awful.
- Cumbersome and confusing apps – I needed to install no less than three apps to control the receiver from my phone: “Denon 2016 AVR Remote” (really, they couldn’t update the name?), HEOS, and MultEQ. The apps do work, but they all have their quirks, they present like antiquated apps written for Android 2.x, and it’s unwieldy to have to juggle three apps. Maybe things are better on the iOS side, but I can’t speak to that. This isn’t a big issue for me because I prefer to use my universal remote to control my receiver, but it may be frustrating for some.
- Low-resolution on-screen UI – This is a really small nit, but the on-screen UI that’s displayed for the menus, volume overlays, etc. is really low-resolution and appears to be rendered in something like 480p. It’s 2021, can we have something a little nicer, Denon?
Recommendations
Complaints aside, my opinion is that this is an amazingly capable receiver that outshines the competition. Not only does it outclass its competition at its price point, but with features like the pre-amp mode, a compelling argument could be made that it punches far above its price point. This would be the receiver I would recommend to my more enthusiast-minded friends and family, would they be in the market for a new receiver.
Configuration pro-tips
Lastly, I’d like to round out my experiences with the AVR-X3700H with tips on how to get the most out of this receiver. These tips will likely apply to many other Denon/Marantz models as well. There’s a lot of ground to cover here, so I’m mostly going to rapid-fire through a bunch of settings without justifying them (for now). Please feel free to ask questions or challenge some of these settings in the comments below! If there’s interest, I might split this out to a separate post that elaborates and justifies these settings in more detail.
First, and foremost, make sure to set up Audyssey correctly and to configure its settings properly. There’s a bunch of ground to cover here that’s beyond the scope of this post, so as I said, stay tuned for some follow up post(s) on this front. For now, my recommendation is to purchase the $20 Audyssey MultEQ Editor app on Android or iOS and then use its setup wizard to perform the calibration. When doing the calibration, make sure to use the microphone that came with your receiver, to use a proper stand or use the provided cardboard tri-pod, and to follow the numbered layout from the setup guide, keeping each microphone position no more than two feet from the first (main) listening position.
Secondly, after running through the initial Audyssey setup, make some tweaks in the app and upload those to your receiver:
- Speaker Detection Results
- Configuration – Set all speakers to “Small”.
- Crossover – Set all speakers to 80Hz.
- Distance and Level – Eyeball these values to make sure they seem reasonable, but don’t tweak them unless you really know what you’re doing and have the equipment to inform your decisions. The subwoofers may have several feet added to them – this is becoming increasingly more common as more subwoofers begin to have integrated DSP capabilities.
- Target Sound Options – I prefer “High Frequency Roll Off 1”, although I don’t think there’s a huge difference.
- Midrange Compensation – Disable this for all speakers.
- MultEQ Frequency Range – For each speaker set this to 500Hz. This can be really tricky to get at exactly 500Hz, just try to get it close. If you’re like me and it really bothers you that you can’t get exactly select this value, you can export your settings to a file and then use ratbuddyssey to precisely enter this value.
- Audyssey Settings
- Dynamic EQ – On
- Dynamic Volume – Off, assuming you’re going for an authentic home theater experience
- LFC – Off, again, for an authentic experience
Third, run through the settings menu on the receiver itself (or via the web portal) and apply these settings. Note that some of these change based on not only the input but also the audio format (Dolby, DTS, etc.) so keep a vigilant eye for a while to make sure settings aren’t reverting back to Denon’s defaults.
- Audio
- Center Level Adjust – Don’t change this. Doing so will overwrite the value that was determined from your Audyssey configuration.
- Subwoofer Level Adjust – Don’t change this. This is the same as Center Level Adjust.
- Surround Parameter
- Cinema EQ – Off
- Speaker Virtualizer – Off
- Additional options may appear here depending on the sound mode. In general, I tend to disable these.
- Restorer – Off
- Audyssey – These settings are crucial to getting the best out of Audyssey and your receiver! If you don’t change anything else, change these!
- MultEQ XT32 – Reference
- Dynamic EQ – On
- Reference Level Offset – 15dB
- Dynamic Volume – Off
- Audyssey LFC – Off
- Graphic EQ – Don’t tweak this. The defaults shouldn’t have put anything here.
- Video
- Picture Mode – Off
- HDMI Setup – Personal preference. If you want to be able to play TV audio from your receiver, enable ARC. If you have a universal remote, I’d suggest disabling HDMI Control.
- Output Settings
- Video Mode – Bypass
- 4K/8K Signal Format – You’ll need to set this to “8K Enhanced” if you intend to attempt to use 8K 60Hz or 4K 120Hz sources.
- Speakers
- Amp Assign
- Amp Mode – Personal preference. Since I don’t have a second zone and I only have a 5.2 setup, I set Assign Mode to a mode that doesn’t mention Zone 2. This effectively disables Zone 2 and prevents accidentally putting the remote in this mode. I then set the Layout to “5ch”.
- Bass
- Subwoofer Mode – LFE
- LPF for LFE – 250Hz
- Amp Assign
- General
- Firmware – Apply firmware updates if available. The November firmware update restores the “center spread” option for the Dolby upmixer, which is a big deal if you use that to upmix your 2-channel audio.
Lastly, hook up your input sources and start enjoying the receiver! Keep a careful eye on the sound mode and ensure that the proper mode is selected. As I called out before, the “auto” mode frequently seems to make the wrong choice. In particular, the first time you listen to a Dolby source and a DTS source, ensure that upmixers are not being used. I’ve found that pressing the green “Movie” sound mode button can usually cycle through the appropriate options. The receiver seems to remember my choices, because I haven’t had to do this for subsequent movies, but this procedure might have to repeated for each input. Additionally, periodically check the Audio settings, as these can vary by input source and sound mode.
Closing
Finally, we’ve reached the end of this post. This post is a bit of a milestone for me in that it’s my first blog post! I say this because I’m still not quite sure what I want this post to be – is it a review, a setup guide, a story, a combination of the three, or something else entirely? But, I’m happy to be putting something out there into the void, and I genuinely hope that this may help somebody on their journey. Even if not, it’s caused me to realize that I surprisingly have so much more to say, so stay tuned for more posts!
Can I hire you to set me up a sound system?
Great post!!
What a great review!
Great review, thanks! I also have the x3700h and agree it’s a great choice and Audyssey works well. Question: what is it about DTS Neural:X you don’t like? I have two front height speakers mainly to experience Atmos music mixes, but it seems nice to also give DTS Master 5.1 audio some added height dimension using Neural:X.
To be honest, I really can’t remember. I don’t have any height channels (yet, but coming soon), and all I remember is that it was doing something undesirable to the mix. I might change my tune when I have height channels. I’ll definitely have to check it out! Thanks for calling that out!
Do you know if anyone is having issues with Sony Bravia TV’s connected to the AVR-X3700H receivers. I have had to factory reset this system 3 times. I finally updated the firmware on my Sony Bravia and am hoping that this fixes the channel change to phono.
I am noticing strange interactions with the HEOS app on my Iphone and the unit. I think the whole system can get confused when using this app and or remotes controlling the system interchangably. Very weird interactions.
No, but I’m just some bloke on the internet :D.
Regarding issues with your Bravia TV. I’m wondering if it potentially has to do with HDMI CEC, which has your TV send commands to your receiver. You can try disabling that on your receiver and/or TV and see if that addresses the issues that you’re seeing. I personally use a smart remote, so I don’t rely on CEC.
I don’t use HEOS either. Like you, I’ve experienced it behaving somewhat flaky.